 Publish Website
DriveHQ supports static web hosting service. To publish a static website (that doesn’t require server-side scripting & database) on DriveHQ is extremely easy.
You only need to upload your website files into the wwwhome folder.
If you have a paid account, your website is automatically published. You can access your website on DriveHQ at: http://USERNAME.firstcloudit.com
The default website file name is “home.htm”. If you use a different default website file, e.g. index.html or default.htm,
you just need to delete the current Home.htm file, upload your index.html / default.htm file into the wwwhome folder,
then make a copy of the home page file and rename the copy as home.htm.
If you have a free account, you cannot publish a website. You must upgrade to a paid account or True Account.
DriveHQ provides flexible and easy-to-use web publishing and hosting service. You can create your own branded website in a few minutes;
what's more, you don't have to register a domain name.
How to publish my website?
For a True Account, your website is not automatically activated. In fact, the current implementation requires a True Account to disable the website and then re-enable the website.
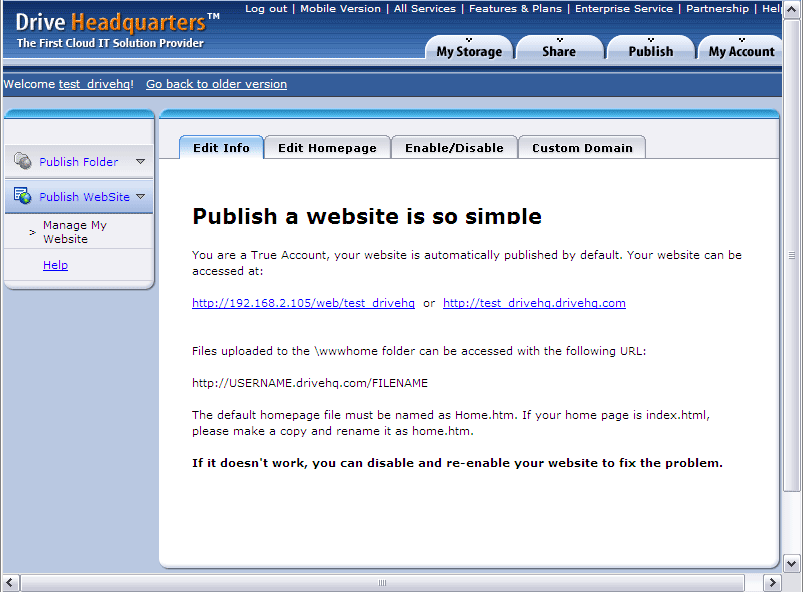
To disable and re-enable your website, from the Publish Main page, click on "Publish My Website", it will go to the following page:

Click on Enable/Disable tab, then click on "Disable My Website" button to disable your website, then click on "Enable My Website" again to re-enable your website.
 Top
Top
How to manage my website HTML files?
You can click on "Edit Homepage" to edit your homepage. However, a recommended method is to create your own home page files using other HTML authoring software, then drag and drop the website files to the wwwhome folder using DriveHQ FileManager or FTP client software.
Please note your default home page file is "home.htm". When you enter: http://USERNAME.firstcloudit.com/
This file will be displayed. If you use other file name as your home page file, you can delete "home.htm", then make a copy of your own home page file and rename it to "home.htm".
You have two ways to manage your website files that will be introduced as below:
1) Advanced Users
Use a professional web-authoring tool to create HTML and graphics files; and then use DriveHQ FileManager to upload the files to "wwwhome" folder on DriveHQ.com. This is recommended for advanced users.
Your website files are stored in the "wwwhome" folder. The default homepage file is "home.htm". All files in "wwwhome" folder and its subfolders are accessible at the following URL:
http://YourUserName.firstcloudit.com/SUBFOLDERNAME/FILENAME
DriveHQ.com offers the best flexibility in publishing and hosting your website.
2.gif) You should never delete "wwwhome" folder. It will break your website even if you re-create the folder. If you accidentally deleted "wwwhome", you need to disable and re-enable your website.
You should never delete "wwwhome" folder. It will break your website even if you re-create the folder. If you accidentally deleted "wwwhome", you need to disable and re-enable your website.
2) Beginners
This works for beginners. Log on to your account, click on "Publish" and click on "Publish My Website" -> "Manage My Website" to edit your websites.
- Go to "Publish Website" main page.
- Click on Edit Homepage to edit your homepage. In this page you can:
- edit the default page in the text box
- upload an existent homepage
- select a homepage template
Your website files are stored in the "wwwhome" folder. The default homepage file is "home.htm". Click on "Go to wwwhome" to access your files. You also can click on "View homepage" to preview your homepage. Once you finished the process above, Click on Submit.
- In the Enable / Disable page, you can enable / disable your websites. It will display a secure URL link to your homepage.
Read the Membership Agreement and check "Yes, I agree", and then click on "Enable my website". Once you enable your website, the button will turn to "Disable my website" . Your can click on it to disable your website.
- DriveHQ provides advanced features for business website hosting. You can specify your own WWW domain name and email domain name in the Custom Domain page. For more detail info, please see the following section.
 Top
Top
How to host you private domain website?
You must own a domain name to use this feature. Please log on domain management page of the company where you purchased your domain. E.g. if you purchase a hosting account from Register.com, you will need to point your domain name's IP settings (A Record) to 69.220.9.55.
If your domain name is currently registered with Register.com and if you use Register.com's Domain Name System Servers (DNS Servers), then you can modify this information online by signing into Account Manager, and selecting the domain name you wish to make the changes to from the main menu.
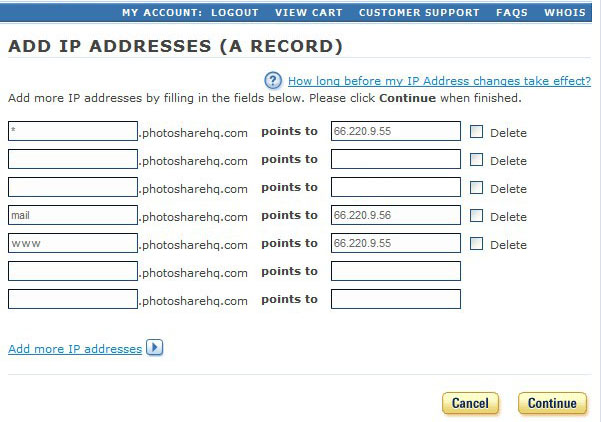
Click on the link "Edit IP Address (A Record)" from the ADVANCED TECHNICAL SETTINGS menu. This will open a page on which there will be an editable list of all of the IP Addresses (A Records) associated with the domain name, shown as below:

Add a hostname in Domain management page of Register.com
To host you private domain website, you need to add an A-Record of "www" that resolves to 66.220.9.47. After you may make the necessary changes, click Continue to apply them. Click Continue again to confirm the changes. Pleast note it takes about 24hours for a DNS name to be updated on the Internet.
Once this is done correctly, open a command window and type in : ping www.YourDomain.com. If the return result is like:
Pinging www.YourDomain.com[66.220.9.47] with 32bytes of data
Request timed out.
Request timed out.
Request timed out.
Request timed out.
Then it has been setup correctly.
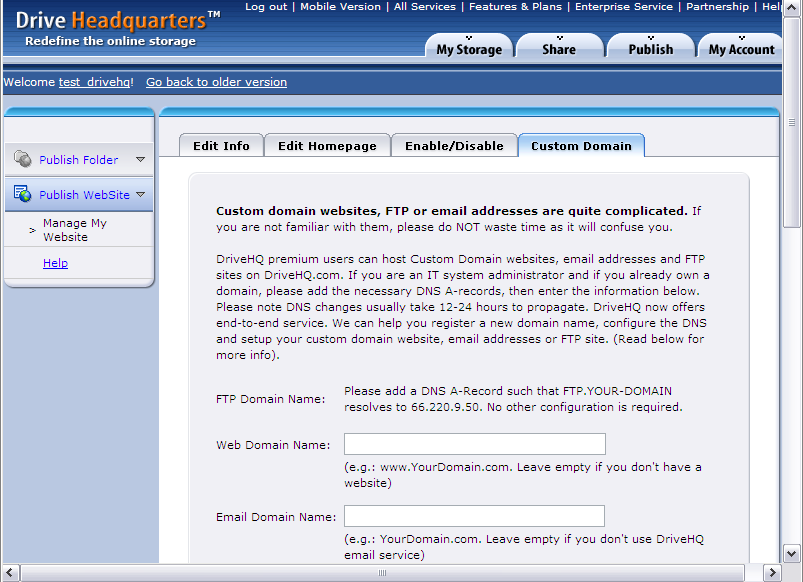
Once you successfully point your domain name's IP settings (A Record) to 69.220.9.55, you should go back to the page of DriveHQ website configuration, shown as below:

Type in your web domain name in Web Domain Name. This way, your website can be accessed with your customized URL. E.g. if your domain name is whitehouse.gov. then assume your web DNS name is www.whitehouse.gov, then your website can be accessed with: "http://www.whitehouse.gov/". Once you finished the process above, Click on Submit.
 Top
Top